What Is Shirt Print Resolution? Your 300 DPI Guide
Discover what shirt print resolution means and how 300 DPI ensures sharp, clear designs for your t-shirts. Get it right with our guide!

What Is Shirt Print Resolution? Your 300 DPI Guide
Shirt print resolution is defined as the pixel density of your design at the exact size you plan to print it, measured in dots per inch (DPI) or pixels per inch (PPI). The printing industry standard for t-shirt designs is 300 DPI at the final print dimensions. Get this right, and your design prints sharp, clear, and professional. Get it wrong, and you end up with blurry text, soft edges, and a shirt that looks nothing like your screen preview.
What is shirt print resolution and why does DPI matter?
Print resolution measures how many dots of ink fit into one inch of your printed design. A higher DPI means more dots per inch, which means finer detail and sharper edges. The 300 DPI standard exists because the human eye cannot resolve individual dots beyond that density at typical arm’s-length viewing distances. Going above 300 DPI adds no visible improvement to the finished shirt.
The term “DPI” and “PPI” are often used interchangeably in apparel printing. DPI technically refers to the printer’s output, while PPI refers to the pixel density of your digital file. For practical purposes, when a printer asks for 300 DPI, they mean your file should contain 300 pixels for every inch of the intended print area.
Screen resolution, which most monitors display at 72 DPI, is far too low for printing. A design built at 72 DPI and printed at full size will look blocky and pixelated on the shirt. This is one of the most common and costly mistakes designers make.
How pixel dimensions and print size determine effective DPI
The relationship between pixels, print size, and DPI follows one formula: print size in inches equals pixel dimensions divided by DPI. This means DPI is not a fixed property of your image. It changes every time you change the print size.
Here is a concrete example. A design that is 3,000 pixels wide prints sharply at 10 inches because 3,000 divided by 10 equals 300 DPI. Print that same file at 20 inches wide, and the effective DPI drops to 150. The pixel count did not change. The quality did.
| Print width | Pixel width | Effective DPI | Result |
|---|---|---|---|
| 10 inches | 3,000 px | 300 DPI | Sharp, professional |
| 15 inches | 3,000 px | 200 DPI | Acceptable for bold designs |
| 20 inches | 3,000 px | 150 DPI | Soft edges, reduced detail |
| 10 inches | 720 px | 72 DPI | Pixelated, unusable |
This is why pixel dimensions matter more than the DPI number listed in your file’s metadata. Image metadata DPI is just a tag. It tells software how to display the image by default, but it does not change the actual pixel count. Metadata DPI can mislead designers into thinking a file is print-ready when it is not.
Pro Tip: When a printer asks for “300 DPI,” give them the pixel dimensions instead. A 10-inch wide design at 300 DPI means a file that is 3,000 pixels wide. That number is concrete and leaves no room for misinterpretation.
Why 300 DPI is the preferred standard for t-shirt printing
300 DPI produces clean results across every design type: fine text, photographic images, gradients, and detailed line work. At this density, edges are sharp, colors transition smoothly, and small type stays readable. Below 150 DPI, intricate line work loses sharpness, small text becomes illegible, and photos appear soft or muddy.
That said, 150–200 DPI can work for specific situations. Large, bold graphics with no fine detail and no small text can print acceptably at lower resolutions, especially when the shirt is viewed from a distance. A large back print with a single bold logo reads fine at 150 DPI. A front chest print with a detailed illustration and small tagline does not.
Different printing methods also have different resolution tolerances:
- DTF (Direct to Film) printing produces photo-quality results and benefits most from 300 DPI files. Fine gradients and photographic detail require the full resolution to transfer cleanly.
- Screen printing uses physical screens and ink layers, so extremely fine detail can be limited by the screen mesh count rather than file DPI. Still, submitting 300 DPI files gives the separator the best source material to work from.
- Sublimation printing works on polyester fabrics and handles fine detail well. 300 DPI is the standard here too, particularly for all-over prints where the design stretches across the full garment.
The 300 DPI standard is the safest baseline regardless of method. Submitting a lower-resolution file puts the burden on the printer to flag the issue, which can delay your order and add cost.
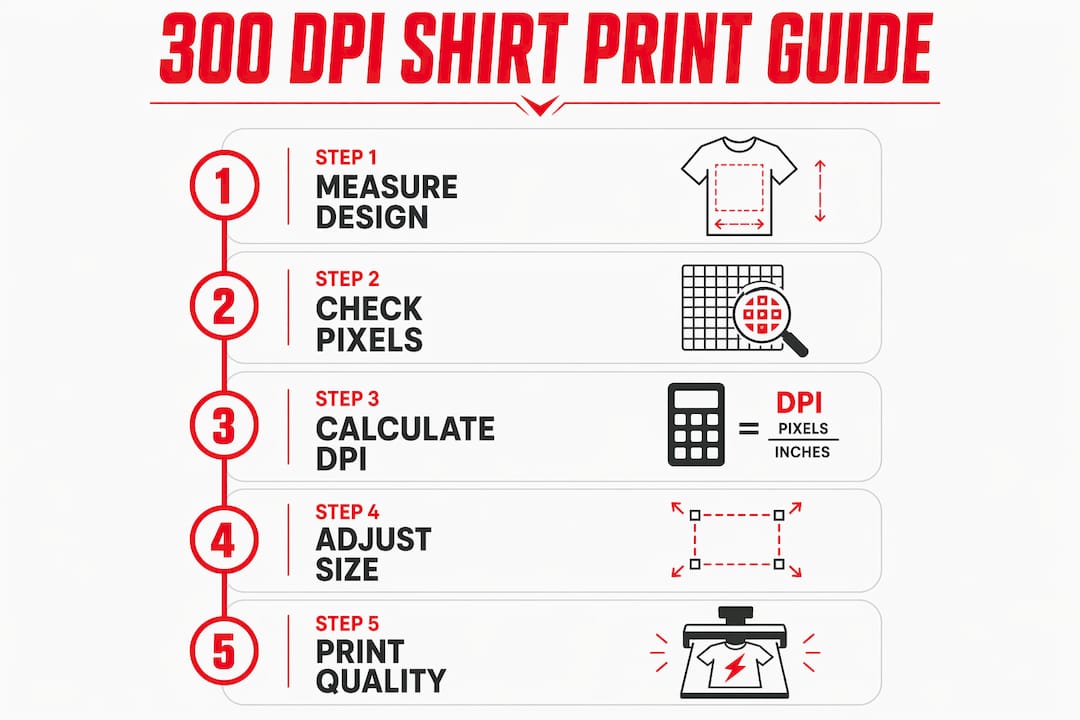
How to prepare t-shirt artwork files correctly
File setup is where most resolution problems start. The right approach is to set your canvas to the final print size at 300 DPI before you draw a single element. Changing the canvas size or resolution after the design is complete forces you to either upscale or crop, both of which reduce quality.
Follow these steps to set up a print-ready file:
- Set canvas dimensions at final print size. If your design print at 12 inches wide by 14 inches tall, set the canvas to exactly those dimensions. Do not design small and scale up later.
- Set resolution to 300 DPI from the start. In Adobe Photoshop, go to File > New and enter 300 in the resolution field. In Adobe Illustrator, set the raster effects resolution to 300 DPI under Effect > Document Raster Effects Settings.
- Use vector elements wherever possible. Vector files (.AI, .EPS, .SVG) scale without quality loss because they are built from mathematical paths, not pixels. Use vectors for logos, text, and solid shapes.
- Check embedded raster images separately. Even inside a vector file, any embedded photograph or raster graphic must meet 300 DPI at print size. A vector file does not automatically upgrade the resolution of images placed inside it.
- Outline all fonts before saving. Converting text to outlines eliminates font-dependency issues and prevents text from reflowing or changing appearance on a different machine.
- Verify resolution without resampling. In Photoshop, open Image > Image Size, uncheck “Resample,” and enter your intended print width. The DPI field will update to show your effective print resolution. If it reads below 300, your file needs more pixels.
- Save in the correct format. PDF, TIFF, and PNG at 300 DPI are the most widely accepted formats for apparel printing. JPEG works but introduces compression artifacts that can soften fine detail.
Pro Tip: Design at 150% of your intended print size if you are unsure of the final dimensions. Scaling down always preserves quality. Scaling up never does.
Checking your design file setup before sending it to a printer saves time, money, and the frustration of reprints. A few minutes of verification prevents a batch of shirts you cannot use.
Common misconceptions about shirt design resolution
The biggest misconception is that changing the DPI number in software makes a file print-ready. It does not. Resampling an image from 72 DPI to 300 DPI in Photoshop does not add new pixel information. It stretches existing pixels and fills gaps with interpolated data. The result looks sharper on screen but prints just as soft as the original.
Upscaling a low-resolution image to 300 DPI in software is the digital equivalent of enlarging a blurry photo. The metadata changes. The actual detail does not. Printers see through it immediately because the pixel dimensions tell the real story.
A second common error is ignoring viewing distance. Apparel is viewed at close range, typically arm’s length or less. This is why viewing distance justifies the 300 DPI standard for shirts when the same image might print acceptably at 150 DPI on a billboard seen from 50 feet away. The closer the viewer, the more resolution matters.
A third mistake is sending files with the correct DPI metadata but the wrong pixel dimensions. Industry experts recommend specifying pixel width and height at the intended print size rather than relying on a DPI label alone. When communicating with a printer, say “my file is 3,600 pixels wide for a 12-inch print” rather than “it’s 300 DPI.” The pixel count is the fact. The DPI label is the interpretation.
When you understand the difference between DTF and screen printing, you also understand why resolution requirements differ between methods. Knowing your print method before setting up your file saves a round of corrections.
Key takeaways
Shirt print resolution is determined by pixel dimensions relative to print size, and 300 DPI at the final print dimensions is the professional standard that guarantees sharp, clear results on any t-shirt.
| Point | Details |
|---|---|
| 300 DPI is the standard | Set every t-shirt design file to 300 DPI at the final print size before designing. |
| Pixel dimensions are the real measure | A 3,000-pixel wide file at 10 inches equals 300 DPI; doubling the print size halves the quality. |
| Metadata DPI misleads | Changing DPI in software without resampling does not add pixels or improve print quality. |
| Vector files still need raster checks | Embedded photos inside vector files must independently meet 300 DPI at print size. |
| Viewing distance drives the standard | Shirts are viewed at arm’s length, which is why apparel requires higher resolution than large-format prints. |
What I’ve learned from years of watching resolution mistakes happen
The clients who struggle most with print quality are not the ones who know nothing about DPI. They are the ones who know just enough to feel confident. They resize a file in Photoshop, see “300 DPI” in the metadata, and send it over. The file looks fine on screen. The print does not.
The fix is simple but requires a mindset shift. Stop thinking about DPI as a setting and start thinking about it as a ratio. Pixel count divided by print size. That ratio is the only number that matters. When I review files at Torontocustomtshirts, the first thing I check is not the DPI metadata. It is the pixel dimensions against the requested print size. That calculation tells the whole story in under five seconds.
The other lesson I keep coming back to is this: file setup at the start of a project costs nothing. Fixing a low-resolution file after the design is complete often means rebuilding it from scratch. Set the canvas right on day one. Design at 300 DPI from the first stroke. That discipline alone eliminates the majority of print quality problems before they start.
— Toronto
Print sharp every time with Torontocustomtshirts
Getting resolution right is half the battle. The other half is working with a printer who knows what to look for before the job runs.
Torontocustomtshirts prints custom t-shirts in Toronto and across the GTA with a focus on clean, accurate results. The team reviews artwork for resolution and file quality before printing, which means problems get caught before they become wasted shirts. Whether you need DTF printing for photo-quality designs or bulk screen printing for a team or event, Torontocustomtshirts handles orders of all sizes with fast turnaround and local pickup in Mississauga. Submit your file and get a quality check before your order goes to press.
FAQ
What DPI should a t-shirt design be?
T-shirt designs should be set to 300 DPI at the final print size. This is the industry standard that produces sharp text, clean edges, and accurate color reproduction on apparel viewed at close range.
Does changing DPI in Photoshop improve print quality?
Changing the DPI number in Photoshop without resampling does not improve print quality. Only the pixel dimensions relative to the print size determine effective resolution; the metadata label is not the same as actual image detail.
Can I use a 72 DPI image for t-shirt printing?
A 72 DPI image printed at full size will appear blocky and pixelated on a shirt. Screen-resolution files are not suitable for apparel printing without a significant increase in pixel dimensions.
What is the difference between vector and raster files for shirt printing?
Vector files (.AI, .EPS, .SVG) scale to any size without quality loss because they use mathematical paths. Raster files use fixed pixels, so they must meet 300 DPI at the intended print size or quality degrades.
Is 150 DPI ever acceptable for t-shirt printing?
150 DPI can work for large, bold designs with no fine detail that will be viewed from a distance. For designs with small text, photos, or intricate line work, 300 DPI is required to avoid visible softness and pixelation.
Recommended
Get pricing in 24h.
Toronto-based, no minimums. Tell us about your project and we'll email a detailed quote within one business day.
Request a Quote