22 inches, 300 DPI Gang Sheet Setup for Toronto Shops
Shop tested steps to build gang sheets for 22 inches wide DTF rolls. 300 DPI PNGs, preflight checks, nesting tips, and cutting workflow.
22 inches, 300 DPI Gang Sheet Setup for Toronto Shops
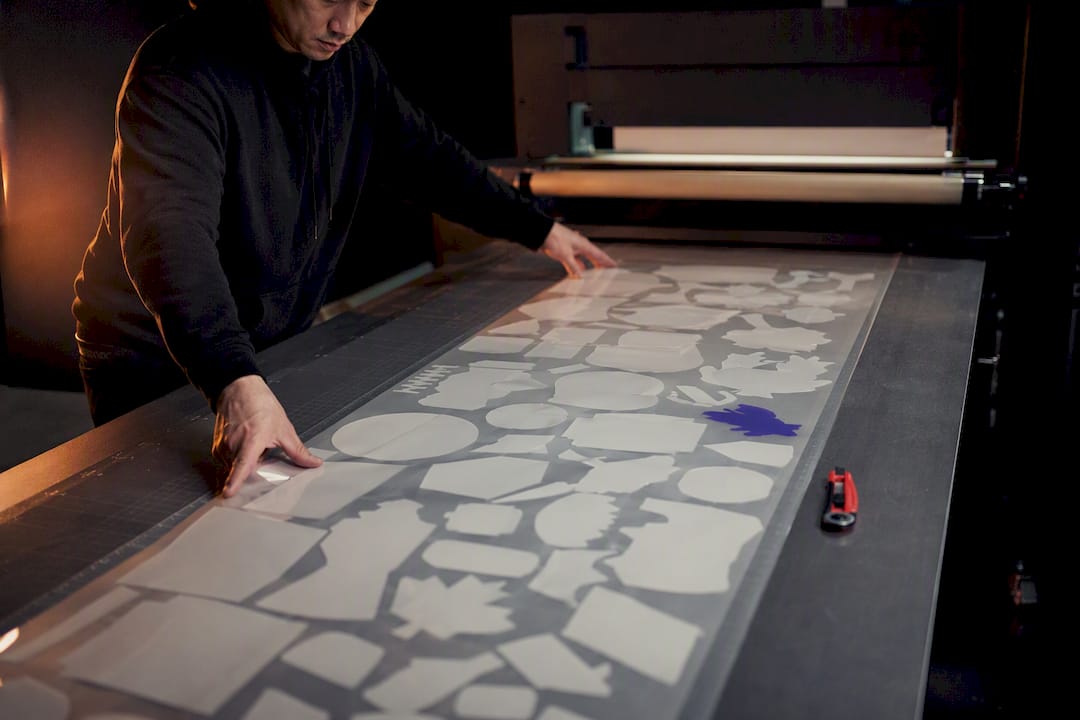
A correct gang sheet is a single high-resolution PNG (transparent, 300 DPI, sRGB) sized to your film, with 22 inches width as the standard, and consistent safety gaps between designs. Get those four things right and you can nest artwork tightly, cut it clean, and cut your per-transfer material cost by a wide margin through smart nesting rather than printing designs one at a time.
TL;DR:
- Designing at 22 inches width and a standard 300 DPI ensures maximum material efficiency and compatibility with most commercial DTF printers.
- Proper file setup with transparent PNGs, correct pixel dimensions, and sRGB color mode prevents rejection and color shifts during printing.
- Using reusable templates and proper nesting techniques can increase sheet utilization to 75-85%, significantly reducing material waste and costs.
- Post-printing, trimming with a small border and group pressing by fabric type improve transfer quality and reduce re-pressing time.
- Outsourcing gang sheet layout and pre-flight checks can save time and improve margins, especially for high-volume or regular runs.
Table of Contents
- What Makes a Gang Sheet Setup Correct?
- What Sizes and Templates Should You Design For?
- What Are the Exact File Specs for a DTF Gang Sheet?
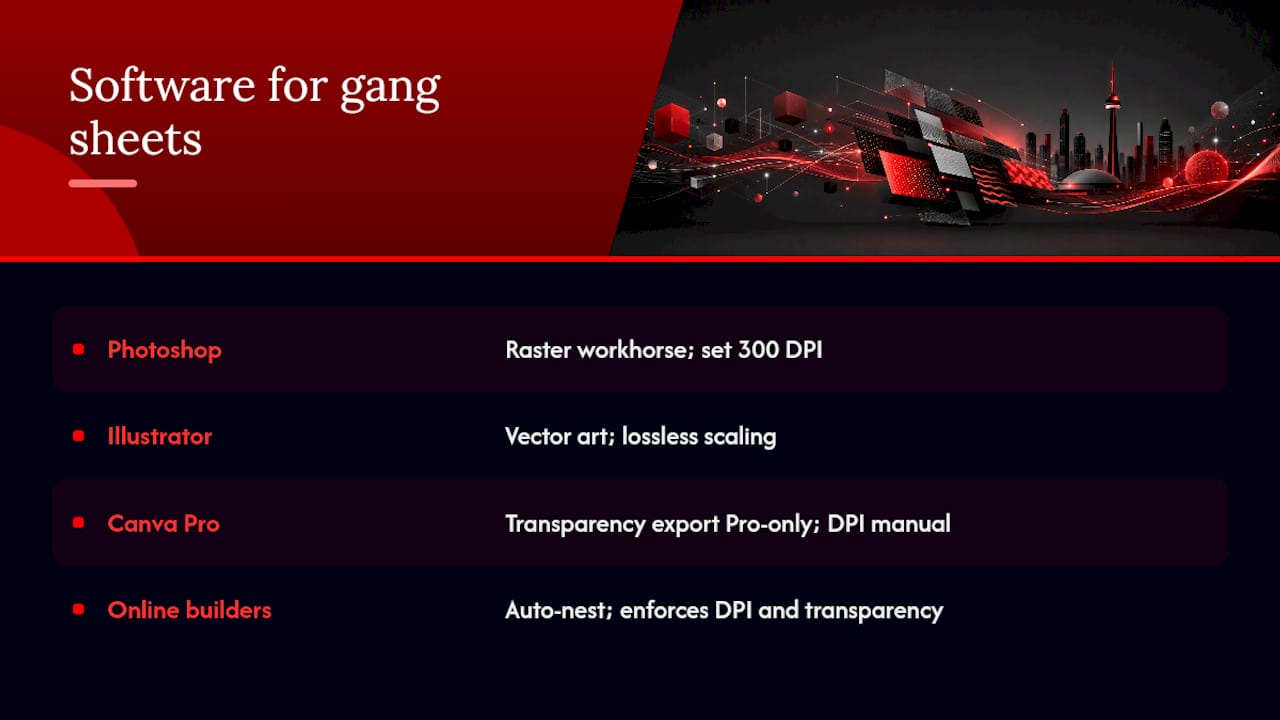
- Which Software Should You Use to Build a Gang Sheet?
- How Do You Nest Designs to Cut Material Waste?
- How Should You Cut and Press a Gang Sheet After Printing?
- What Does Shop-Tested Gang Sheet Setup Actually Look Like?
- Why Gang Sheet Setup Is Really a Margin Problem
- Let Toronto Custom T-Shirts Handle Your Gang Sheet Printing
- Sources
What Makes a Gang Sheet Setup Correct?
A gang sheet is a digital canvas packed with multiple designs, printed as one continuous file, then cut apart into individual DTF transfers. The point of the whole exercise is efficiency: instead of running your printer once per design, you run it once for a whole batch, and the film, ink, and press time get split across everything on the sheet.
That’s the real financial engine behind DTF gang sheet layout. Printing designs individually wastes film on the gaps between images and multiplies setup time. Nesting them onto shared film can cut material costs by a substantial percentage compared with one-off printing, because every design shares the same length of film instead of getting its own.
None of that savings shows up automatically, though. A gang sheet only pays off when the setup behind it is clean: right resolution, right color space, right spacing, right file format. Skip any one of those and you either get a rejected file, a smeared print, or a sheet full of wasted film. The rest of this guide walks through exactly how to build one that a printer will accept on the first try, and how to lay it out so you’re not throwing away material you already paid for.
What Sizes and Templates Should You Design For?
Most commercial DTF printers run film at 22 inches wide, which has become the de facto standard across the industry. That width dictates how you build your canvas from the start. Design at anything narrower and you’re leaving usable film unused; design wider and your file won’t fit the roll at all.
Sheet length is the flexible variable. A short sheet, something in the 30 to 60-inch range, works for testing a new design or filling a small order. Longer runs, sometimes 100 inches or more, make sense once you’re batching multiple orders or restocking a bestseller and want to minimize how many times you touch the printer.
If you’re just getting started, many shops recommend building your first layouts at a smaller size, like a 13x19-inch desktop print area, before scaling up to full 22-inch production sheets. It’s a lower-stakes way to learn spacing and nesting before you’re committing a full roll of film to a layout.
Building a reusable template saves real time once you move past one-off jobs. Set it up once with these steps:
- Set your canvas to 22 inches wide (or your printer’s actual film width) by your chosen length, at 300 DPI.
- Add guide lines for a safe margin around the outer edge, roughly 0.25 inch, so nothing gets clipped near the film’s border.
- Save the blank canvas as a master file (PSD, AI, or your builder’s native format) before you place a single design.
- Duplicate that master for every new job instead of starting from a blank canvas each time.
A template like this turns setup from a 15-minute task into something closer to two minutes, which adds up fast across dozens of orders a week.
What Are the Exact File Specs for a DTF Gang Sheet?
Printers reject files for the same handful of reasons over and over: wrong resolution, no transparency, or a color mode the RIP software doesn’t expect. Locking down your specs before you start designing eliminates almost all of it.
Build every file at 300 DPI, export as a PNG with a fully transparent background, and work in RGB, specifically sRGB, for predictable results. PNG-24 is the preferred format because it preserves transparency without the lossy compression you’d get from a JPEG. PDF or TIFF can work if your shop’s workflow specifically calls for it, but PNG remains the safest default across almost every DTF printer and online builder.
Pro Tip: Don’t trust the “300 DPI” label alone. Check the actual pixel dimensions. A 22-inch-wide canvas at 300 DPI should measure exactly 6,600 pixels across (22 x 300). If your file comes in short of that, something got resized or exported wrong along the way.
Color mode matters more than most people assume. Design files that come in as CMYK or a mismatched color profile force the printer’s software to convert on the fly, and that conversion is where colors shift unpredictably. Working in sRGB from the start means what you see on screen is far closer to what comes off the printer.
Transparency deserves its own check. Zoom in at 400 to 800 percent around the edges of every design and look for faint gray or white pixels left over from a bad background removal. Those “ghost pixels” print as a visible haze around your artwork, one of the most common complaints in DTF gang sheet layout work.
Before uploading anything, run this checklist:
- Confirm the file is a PNG with a transparent background, not white.
- Verify pixel dimensions match inches times 300 DPI exactly.
- Confirm the color mode is RGB (sRGB), not CMYK.
- Zoom into every design edge and check for stray or ghost pixels.
- Flatten any text layers and confirm nothing got mirrored by accident during export.
A file that clears all five checks almost never bounces back for revision.
Which Software Should You Use to Build a Gang Sheet?
The right tool depends on your volume and how comfortable you are with layout software. Each of the main options handles the same core job differently.
Photoshop is the workhorse for raster-heavy designs. Start with File > New, set your dimensions in inches, and lock the resolution to 300 DPI before you place anything. Use Place Embedded rather than Place Linked when you bring in artwork, then convert each layer to a Smart Object. That single habit prevents the resolution loss that happens when you scale a raster layer up and down repeatedly while nesting it. Set up separate artboards for different sheet lengths so you’re not rebuilding a canvas every time an order size changes.
Illustrator earns its place when your artwork is vector, logos, text-based designs, simple line art. Vectors scale to any size with zero quality loss, which makes nesting and resizing during layout far less risky than with raster files. Artboards work the same way here as in Photoshop, letting you keep multiple sheet sizes in one project file.
Canva Pro can work in a pinch, but it comes with two real limits worth knowing before you commit a project to it. Exporting a transparent background is a Pro-only feature, not available on the free tier, and hitting an exact 300 DPI output requires manual pixel math since Canva’s custom-size export doesn’t always default to it cleanly.
Online gang-sheet builders fill a different niche entirely. They auto-nest your uploaded designs, enforce spacing automatically, and flag files that don’t meet DPI or transparency requirements before printing. That auto-nesting is genuinely useful for newcomers or anyone running smaller volumes. Experienced shops running high volume, though, often still build sheets by hand so they can control exactly which designs sit next to each other for cutting and pressing sequence.
How Do You Nest Designs to Cut Material Waste?
Nesting is the actual skill behind efficient gang sheet layout, and it’s where most of your cost savings either happen or get left on the table. The goal is simple: fit as much printable area onto the sheet as possible without crowding it so tight that cutting becomes a nightmare.
The standard approach mirrors basic bin-packing logic. Place your largest designs first, since they’re the hardest to fit later once smaller pieces have already claimed the easy gaps. Then work down in size, tucking smaller designs into whatever space remains around the big ones. Rotating pieces 90 degrees, or any angle that fills a gap, often recovers space that would otherwise sit empty.
Spacing is where a lot of people either waste film or set themselves up for a bad cut. A minimum gap of 0.25 inch between designs is common practice, but if you’re cutting by hand rather than with an automated contour cutter, about half an inch gives you a much safer margin against nicking an adjacent design. Manual trimming favors those larger gaps and straight-line groupings; automated cutters can pack tighter but need their own setup files and registration marks to work properly.
Utilization percentage is the number that actually tells you whether your layout is efficient. It’s the printed design area divided by the total sheet area. A well-optimized sheet typically lands between 75 and 85 percent utilization; anything under roughly 65 percent means you’re printing a lot of blank film you’re paying for.
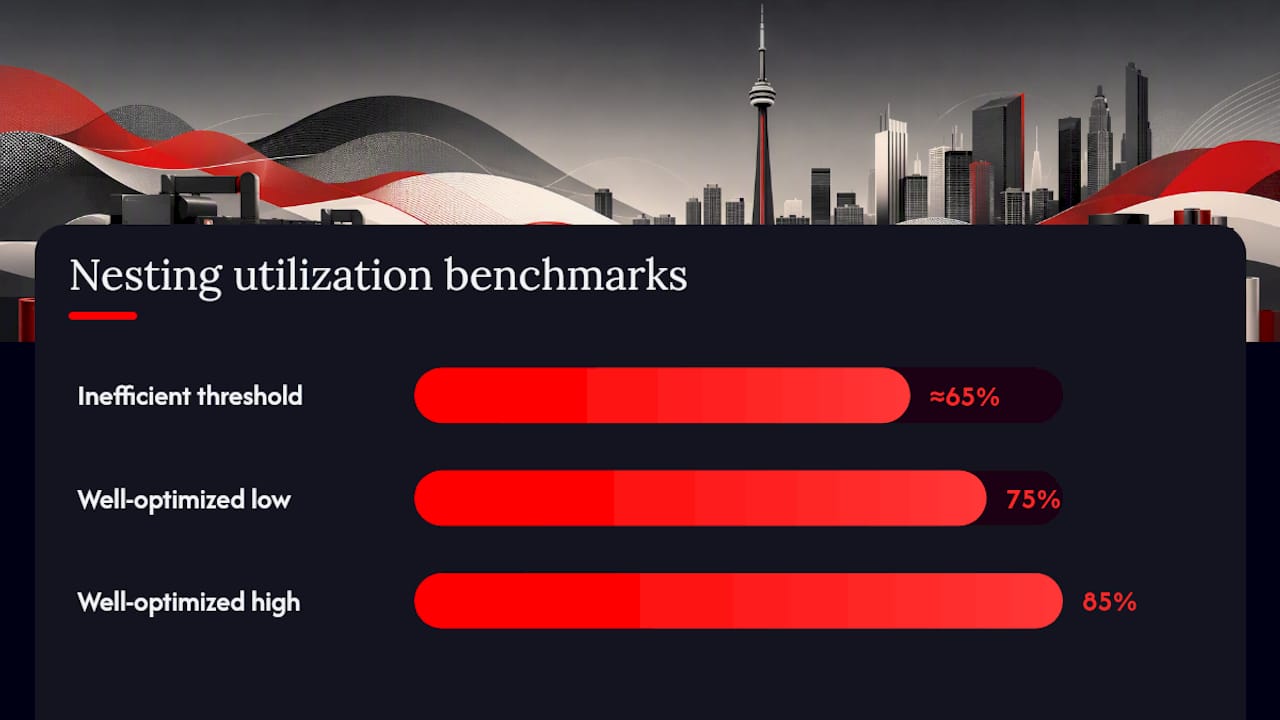
Here’s a simple way to see how utilization affects your real cost per design:
Quick things that consistently boost utilization on a real sheet:
- Group similarly sized designs together before you start placing them.
- Mix orientations, some upright, some rotated, rather than forcing everything into one direction.
- Leave your safety gap consistent across the whole sheet instead of eyeballing it design by design.
- Save a nesting pattern that worked well as a starting template for future sheets with similar design sizes.
How Should You Cut and Press a Gang Sheet After Printing?
Printing the sheet is only half the job. What happens after, cutting, sorting, and pressing, determines whether all that careful layout work actually shows up as a clean finished product.
Follow these steps once a sheet comes off the printer:
- Trim around each design leaving a small clear border, roughly 2 to 3 mm, rather than cutting flush against the artwork edge.
- Sort cut transfers by fabric type and press setting before you start pressing anything.
- Run a spot press test on one transfer per batch to confirm adhesion before committing the whole order.
- Press at the temperature and time range appropriate for the fabric, adjusting for hot peel versus cold peel film as needed.
- Visually inspect a few finished pressings for stray white pixels or edge haze that would signal a transparency problem back in the file.
Grouping designs by press settings before you start, rather than pressing in whatever order they happen to sit on the sheet, cuts down on re-pressing and speeds up fulfillment considerably on multi-design orders. If a press keeps struggling with adhesion on one particular design, the fix usually traces back to the file: check for low-resolution source art or a background removal that left semi-transparent edge pixels behind. For a deeper look at press parameters across different fabrics, our DTF transfer application guide covers hot versus cold peel behavior in more detail.
What Does Shop-Tested Gang Sheet Setup Actually Look Like?
Most rejected or reprinted sheets trace back to the same handful of mistakes, and after running enough orders through the shop, the pattern becomes obvious. White boxes around artwork mean a transparency export failed somewhere. Blurry or pixelated results almost always trace back to source art that got upscaled past its native resolution instead of being properly reworked. Designs printing at the wrong scale usually mean someone resized a layer without checking that the DPI stayed locked at 300.
A pre-flight routine catches nearly all of it before a sheet ever hits the printer:
- Confirm file specs (PNG, transparency, 300 DPI, sRGB) on every incoming design before layout.
- Group designs by fabric type and press setting, not just by customer or order number.
- Use a consistent naming convention so a specific design can be traced back to its original order in seconds.
- Batch similar-sized orders together to run longer, more efficient sheets instead of many short ones.
Batching is what separates a shop running efficiently from one constantly reprinting small jobs. Holding several smaller orders for a few hours to combine them onto one longer sheet almost always beats printing each one the moment it comes in. Our guide on what to check before ordering custom apparel covers more of the pre-flight review process from the customer side.
Why Gang Sheet Setup Is Really a Margin Problem
The technical checklist matters, but the real reason to master gang sheet setup is what it does to your numbers. A shop running sheets at 55 percent utilization and one running the same volume at 80 percent are not competing on the same cost structure, even if they charge customers the same price. That gap compounds fast once you’re printing dozens of sheets a week.
Speed and density pull in opposite directions sometimes, and that’s fine. A rush order doesn’t need the tightest possible nest; it needs to go out the door. Save the meticulous packing for standing orders and restocks where you have time to actually optimize the layout.
What I’d push back on is treating gang sheet setup as a one-time skill you learn and move past. The shops getting the best margins are the ones that built templates, locked in their spacing rules, and turned pre-flight checks into habit rather than an afterthought done under deadline pressure.
— Toronto
Let Toronto Custom T-Shirts Handle Your Gang Sheet Printing
If reading through DPI math, pixel dimensions, and nesting ratios sounds like more setup time than your business has room for, that’s exactly the gap a professional DTF gang sheet printing service fills. We run DTF gang sheet printing with artwork pre-flight built into the process, so files get checked for resolution, transparency, and spacing before anything hits the printer, not after.
DIY setup makes sense when you’re running small, occasional batches and already have the software skills to build clean files. Once you’re placing regular bulk orders, though, outsourcing the nesting, color checks, and cutting can save time, while you get finished transfers ready for pickup or shipping. For teams, brands, or events ordering multiple designs at once, our bulk order options include volume discounts that make outsourcing the layout work pay for itself. Upload your files or request a quote through Torontocustomtshirts and get a batch of print-ready transfers back without touching a single pixel yourself.
Sources
- DTF Gang Sheet Layout & Printing Guide: Build, Nest, Save | DTF Database
- How to Make a DTF Gang Sheet File: Photoshop, Canva & Free Online Builder – Bear Transfers
- How to Make a DTF Gang Sheet: The Ultimate 2026 Step-by-Step Guide – Iris DTF
- How to Design a DTF Gang Sheet — File Specs & Layout | RoyalDTF
Recommended
Get pricing in 24h.
Toronto-based, no minimums. Tell us about your project and we'll email a detailed quote within one business day.
Request a Quote