DTF Transfer Application: Home & Small-Shop Guide
Master the DTF transfer application with our home and small-shop guide. Learn key techniques for lasting prints that withstand 50 washes.
DTF Transfer Application: Home & Small-Shop Guide
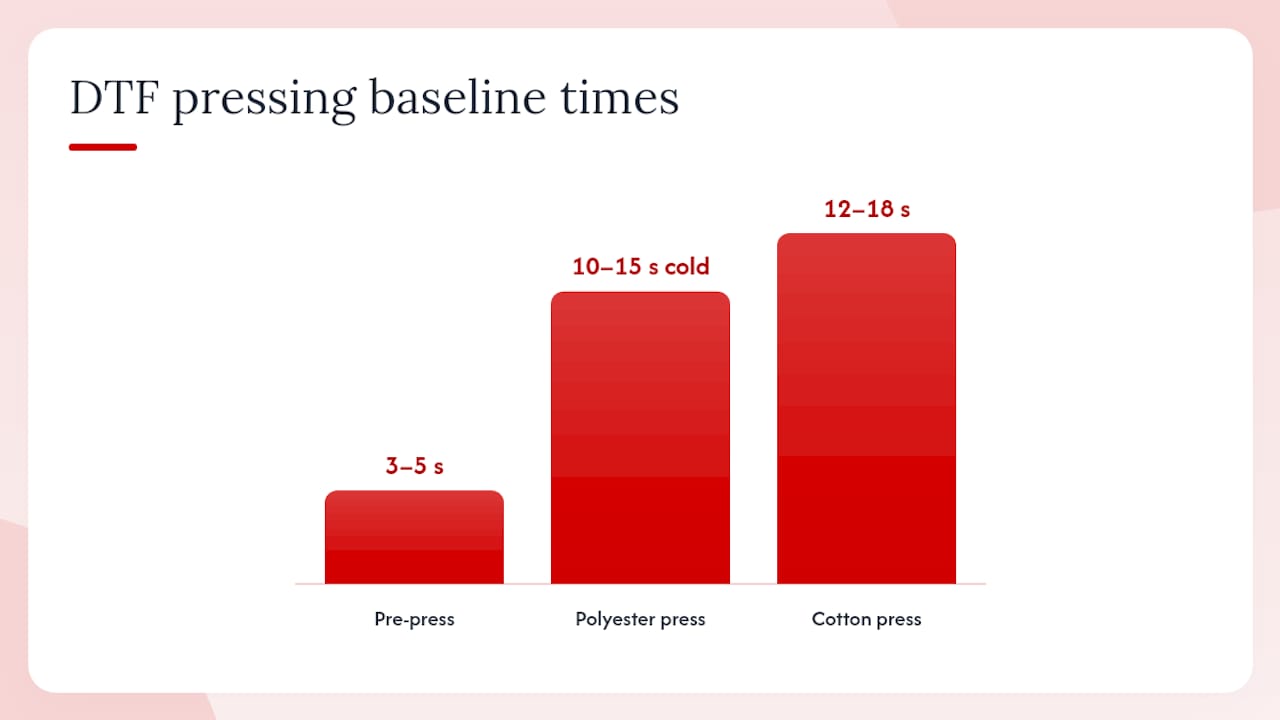
Preheat your press, pre-press the blank for 3–5 seconds, lay the DTF film face-down on the garment, press at your film supplier’s recommended temperature and time, then peel hot or cold per the film’s spec. That sequence, done consistently, is what separates a print that survives 50 washes from one that starts lifting after the third. According to DTF Heat Press Technology’s settings guide, the three variables that control every outcome are temperature, time, and pressure — and published numbers are starting points, not guarantees. On 100% cotton, a typical baseline uses 310–330°F for 12–18 seconds with medium-heavy pressure and a warm or hot peel. Polyester drops to 290–310°F for 10–15 seconds with cold peel to prevent dye migration. Pre-press first, always. Skipping it leaves residual moisture in the fabric that breaks adhesion before it even starts.
Quick-reference timeline: Preheat press → pre-press garment (3–5s) → position transfer → cover with Teflon/parchment → press → peel per film spec → optional re-press (3–5s).
Hot peel means pulling the film back immediately after the platen lifts, while the adhesive is still warm and pliable. Cold peel means waiting until the transfer cools to room temperature before pulling. Your film supplier’s spec sheet determines which one applies. Never guess. Heat-resistant gloves are not optional when you’re peeling hot.
Key Takeaways
Correct DTF transfer application requires pre-pressing the blank, pressing at fabric-specific temperature and time with adequate pressure, peeling per the film spec, and re-pressing to cure the adhesive fully.
| Point | Details |
|---|---|
| Pre-press every time | Drive out moisture with a 3–5s pre-press before placing the transfer — skipping it is the top cause of adhesion failure. |
| Use fabric-specific baselines | Cotton starts at 310–330°F for 12–18 seconds; polyester drops to 290–310°F for 10–15 seconds with cold peel to prevent permanent dye migration. |
| Peel method is not optional | Hot peel and cold peel are film-specific — pulling a cold-peel film warm causes edge lifting that cannot be fixed. |
| Always test on scrap | Run a 3×3 temp/time grid on scrap fabric before pressing any customer or high-value garment. |
| Torontocustomtshirts | Offers professional full-color DTF printing with calibrated production for single orders and bulk runs across Toronto and the GTA. |
Table of Contents
- What do you need before you start pressing?
- How do you apply a DTF transfer step by step?
- How do you apply DTF transfers with an iron or Cricut EasyPress?
- Which fabrics work best with DTF, and how do you prep them?
- How do you finish and wash a DTF print so it lasts?
- Why do published settings vary, and how do you calibrate your press?
- The part most guides skip over
- Get professional DTF prints without the calibration guesswork
- Useful sources
What do you need before you start pressing?
Getting the setup right before you touch the press saves ruined garments. Here’s the complete list:
Essential equipment and consumables:
- DTF transfer sheet (from your supplier or printed in-house)
- Calibrated heat press, Cricut EasyPress, or a household iron
- Teflon sheet or parchment paper (silicone-coated, not wax)
- Lint roller
- Heat tape (also called heat-resistant tape)
- Heat-resistant gloves
- Scrap fabric in each material type you’ll be pressing
- Ruler or T-square for placement alignment
- Infrared thermometer or surface contact probe
On the consumables side, not all DTF film is the same. Adhesive powder cure temperature and particle size vary by supplier, and a film that works perfectly at 320°F on one brand may crack at the same setting on another. If you’re switching suppliers, treat it as a new calibration job. Excess adhesive powder on the edges of a transfer is a common cause of border lifting — check your film before pressing and brush off any visible powder buildup.
Cricut DTF transfers are a practical option for home users who want pre-made film without owning a DTF printer. The Cricut EasyPress is the companion device Cricut recommends for applying them, and Cricut publishes a Heat Guide with device-specific settings for each transfer type. Follow that guide exactly rather than using generic baselines.
Pro Tip: Keep a dedicated scrap kit: a 6×6-inch swatch of each fabric type you press regularly, labeled with the fabric content. Run every new film or new press setting on scrap first, and keep the tested swatches in a binder with your logged settings. It takes ten minutes to build and saves hours of rework.
How do you apply a DTF transfer step by step?
This sequence works for a commercial clamshell or swing-away press. Adjustments for irons and EasyPress units are in the next section.
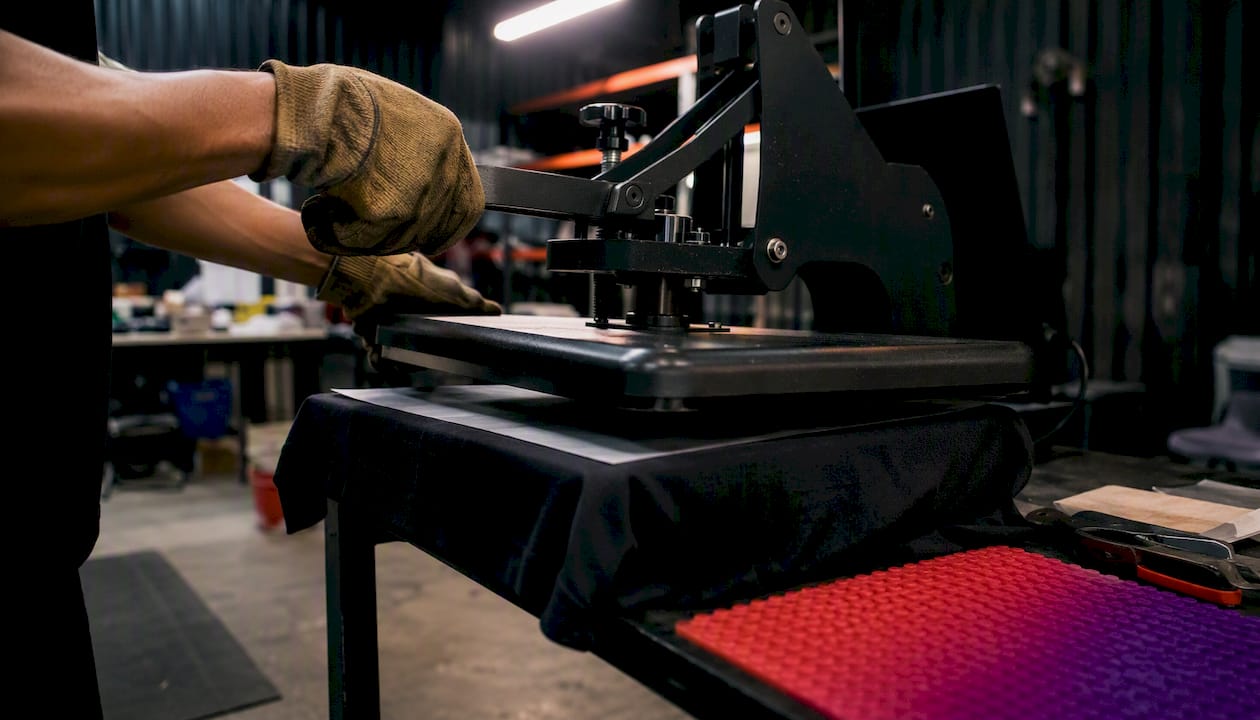
- Apply the press — using your supplier’s starting settings. Close firmly and evenly. On a clamshell press, make sure the platen contacts the full print area — partial contact is a pressure dead zone.
For placement across a seam or zipper, use a silicone pressing pad or a folded heat-resistant foam underlay beneath the garment. It creates a flat surface so the platen applies even pressure across the whole design rather than rocking on the raised seam. A
on cotton tees shows exactly how the film should behave at each stage.
For small labels or patches (under 2×2 inches), a silicone pad is especially useful — the smaller the transfer, the more a seam or hem can throw off pressure distribution.
How do you apply DTF transfers with an iron or Cricut EasyPress?
A commercial heat press delivers flat, even, calibrated pressure across the full platen. An iron or EasyPress can’t fully replicate that, but both work well for single items and home projects when used correctly.
Cricut EasyPress:
- Preheat the EasyPress to the temperature in Cricut’s Heat Guide for your specific transfer type.
- Pre-press the garment for 5 seconds, moving the EasyPress slowly across the area.
- Position the transfer face-down and secure with heat tape.
- Cover with a Teflon sheet or parchment.
- Press firmly for the time specified in the Heat Guide, applying steady downward pressure. Do not rock or slide.
- Repeat the press in overlapping sections if the design is larger than the EasyPress plate.
- Peel per the film spec, then re-press for 3–5 seconds.
Domestic iron:
Follow the same sequence, but set the iron to the cotton or synthetic setting that matches your fabric. Turn off steam completely. Press in 10–15 second intervals, moving the iron in a slow, overlapping grid pattern. Apply firm, even downward pressure rather than sliding.
Limitations to know: Both devices have smaller platen areas, which means large designs require multiple overlapping passes with a real risk of inconsistent bonding at the seams between passes. Pressure is also harder to control than on a platen press, and thick fabrics like fleece or heavy denim may not bond reliably.
Pro Tip: Place a silicone pressing pad or a firm, folded towel on a hard, flat surface before pressing. A soft or uneven surface absorbs pressure instead of reflecting it back into the transfer. The firmer the surface beneath the garment, the better the bond.
Which fabrics work best with DTF, and how do you prep them?
DTF transfers bond to virtually any fabric, but results vary significantly by material. Here’s a quick breakdown:
- 100% cotton: The most forgiving. Adhesive bonds well, colors stay vivid, and hot peel is usually fine.
- Cotton-poly blends: Adjust temperature down from the cotton baseline and use cold peel. The polyester content raises dye migration risk at higher temps.
- 100% polyester: Lower temp, cold peel, and always test first. Dye migration is a permanent failure mode — once the dye bleeds into the adhesive layer, the print is ruined.
- Nylon and performance wicking fabrics: Low temp, light pressure, cold peel. These fabrics are heat-sensitive and can distort or delaminate at temperatures that work fine on cotton.
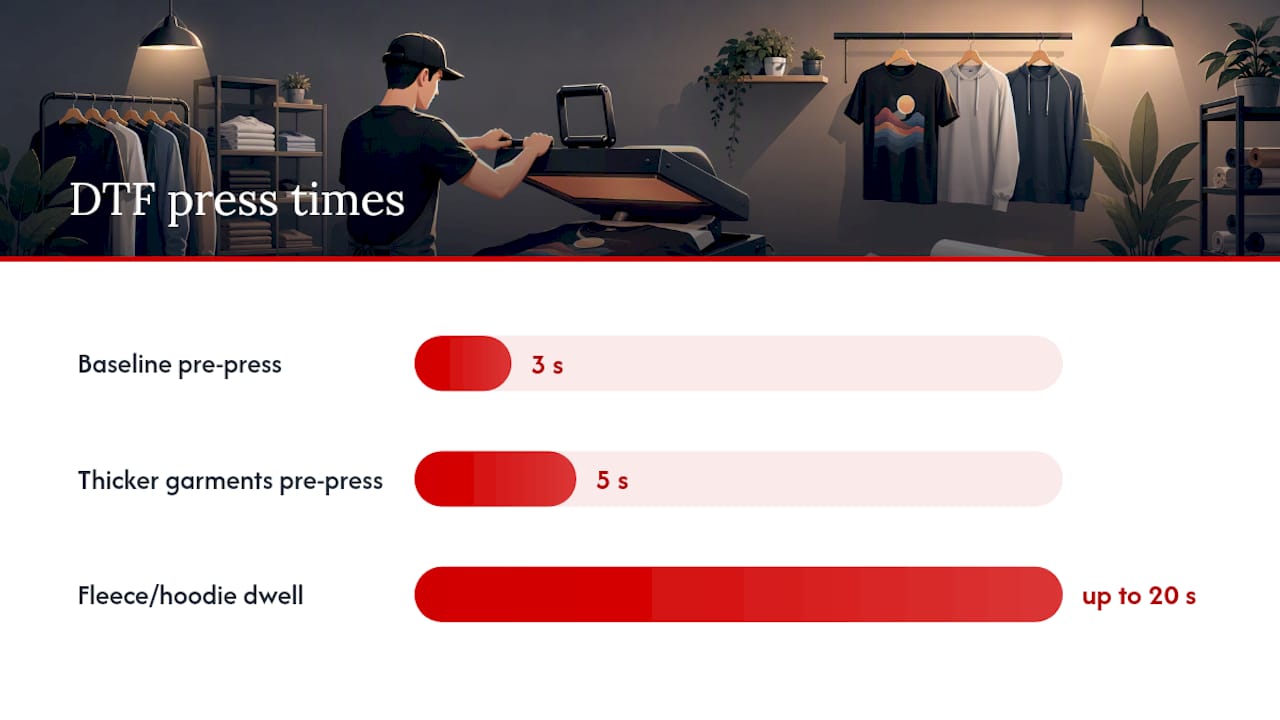
- Fleece and hoodies: The pile surface requires firm pressure and a longer dwell time (up to 20 seconds) to push the adhesive through the texture. A re-press is especially useful here.
- Heavy denim and canvas: Dense weave needs heavy pressure and a longer dwell. Pre-pressing is critical to flatten the surface.
Prep checklist before every press:
- Pre-wash new blanks to remove sizing and fabric treatments that block adhesion.
- Lint-roll the print area immediately before pressing.
- Pre-press to remove moisture and wrinkles.
- Flatten seams, zippers, and pockets away from the print zone.
- For chest prints on hoodies, position the design to avoid the pocket seam when possible. If the design crosses a seam, use a silicone pad underlay and secure the transfer edges with heat tape.
Pro Tip: For DTF printing on hoodies and thicker garments, the pre-press step matters more than on a flat tee. Run 5 seconds instead of 3 to fully drive out moisture from the thicker fabric layers before the transfer goes down.
How do you finish and wash a DTF print so it lasts?
The re-press step after peeling is where a lot of people skip out early. Don’t. Lay your Teflon sheet back over the print and press for 3–5 seconds at the same temperature. This final pass smooths any adhesive texture, seals the edges, and noticeably improves wash durability. Washfastness testing protocols from AATCC confirm that adhesive cure and surface bonding directly affect how a print holds up through repeated laundering.
Wash and care instructions:
- Turn the garment inside out before washing.
- Cold wash, gentle cycle.
- Mild detergent — no bleach, no fabric softener on the first several washes.
- Tumble dry on low heat or air dry flat.
- Do not iron directly over the print.
If your film supplier specifies a waiting period before the first wash (some recommend 24–48 hours after pressing), follow it. The adhesive continues to cure slightly after pressing.
If cracking or edge lifting appears after the first wash: Re-press the affected area with a Teflon sheet at your calibrated temperature for 5–8 seconds. Then check your heat and pressure logs. If the problem repeats, run a new scrap test at 5°F higher or with slightly more pressure.
Why do published settings vary, and how do you calibrate your press?
Every heat press is different. The display temperature and the actual platen surface temperature are often not the same number, and that gap changes as the heating element ages. Press type matters too: a clamshell applies pressure differently than a swing-away, and a drawer press differently still. Ambient humidity, adhesive powder batch variation, and even the thickness of your Teflon sheet all shift the outcome. Printing industry best-practice guidance consistently emphasizes that press calibration and parameter logging are non-negotiable parts of any shop’s quality process.
Calibration checklist:
- Verify platen temperature with a contact probe or infrared thermometer at the center and at all four corners. Note any variance.
- Set your press to your target temperature and let it fully stabilize (at least 10 minutes).
- Run a 3×3 scrap test grid as described in the settings section above.
- Record the winning cell’s temp, time, and pressure feel in a log.
- Repeat for each fabric type you press regularly.
- Lock those settings as your baseline and revisit them after maintenance or after any press repair.
Pro Tip: Log every production run with a short note: date, fabric, film supplier, temp, time, pressure, peel method, and result. Re-check your calibration after every 200–500 presses or after any maintenance. A 10-minute calibration session prevents a full run of ruined garments.
A printable DTF application instructions checklist is available from one supplier that covers pre-press, positioning, cover materials, and peel methods in a format you can post at your press station.
The part most guides skip over
Most DTF application guides hand you a temperature table and call it done. The table is the easy part. What actually separates a reliable result from a frustrating one is understanding that your press is a variable, not a constant.
A heat press that reads 320°F on the display might be delivering 305°F at the left edge of the platen and 330°F at the center. That’s not a defect — it’s normal variation, and it’s why the same settings that work perfectly for one shop produce lifting edges or scorched prints for another. The fix isn’t a better table. It’s a thermometer, a scrap swatch, and ten minutes of honest testing.
The other thing worth saying plainly: dye migration on polyester is a one-way door. Once the dye bleeds into the adhesive layer at excessive temperature, the print is permanently discolored. No re-press, no wash, no fix. That single failure mode is the strongest argument for testing on scrap before touching a customer’s $60 performance jersey.
Logging your settings isn’t busywork. It’s the difference between a shop that can reproduce a result and one that gets lucky sometimes. Every professional printer worth their equipment keeps a press log.
Get professional DTF prints without the calibration guesswork
If you’re pressing high-value garments, running large orders, or simply not ready to invest in press calibration, Torontocustomtshirts handles the full production process for you. Full-color DTF printing in Toronto with no minimum order, fast turnaround, and local pickup in Mississauga means you get production-quality results without owning a press or running a single test swatch.
Single shirts, team orders, event merch, or bulk apparel runs — Torontocustomtshirts works with both personal and business orders across the GTA. Every print goes through a calibrated production process, so the adhesion, color, and wash durability are consistent from the first piece to the last. Get a quote or place your order at torontocustomtshirts.ca.
Useful sources
- DTF Heat Press Settings: Temperature, Time & Pressure Guide | DTF Printing Technology
- Heat Press Settings Finder — Turnkey Transfers
- DTF Transfer Temperature and Pressure Guide by Fabric Type – ClothingSpace
- DTF Transfers Explained: What They Are and How to Use Them – Cricut
- DTF application instructions (PDF) — Shopify CDN
- aatcc.org
Recommended
Get pricing in 24h.
Toronto-based, no minimums. Tell us about your project and we'll email a detailed quote within one business day.
Request a Quote